X5 PPK Mavic 2 Pro
Documentation
The X5 PPK Module for Mavic 2 Pro is a-non intrusive GNSS adapter system to connect to a DJI Mavic 2 Pro Drone (not included). Positioning with centimeter accuracy in PPK. For precise UAV mapping with less GCPs. X5 PPK module is ready to use, and no configuration is needed, you can download the RAW data from the SD card or Wi-Fi.
- Version: 1.0
- Main advantages:
- No need to open or modify your Drone (keep your Drone's original warranty)
- The X5 PPK Module attaches and detaches in seconds
- No batteries required
- Ultra-fast image triggering detector sensor
- Lightweight device: 72 grams
- Trigger sensor: A sensor installed externally on the M2P drone detects the triggering of each photograph and records a time stamp in the log file. Timestamps and position events can be extracted from the module after flight and combined for geotagging using various specialized software options available on the market.
If you have any questions that are beyond the scope of this documentation, Please feel free to contact our Mettatec X5 Support contact.
Included components
- GNSS X5 Module unit with internal battery
- Multi-band Aerial Antenna HeliX5 for UAV
- Antenna mount, connection cable, and high resistance 3M synthetic velcro
- Photo Trigger Sensor attached to the module support
- 32 GB MicroSD memory card for recording GNSS data
Technical specifications
| Mechanical |
|
| Electrical |
|
| Positioning |
|
| Connectivity |
|
| Data |
|
| GNSS |
|
Ports and LEDs descriptions
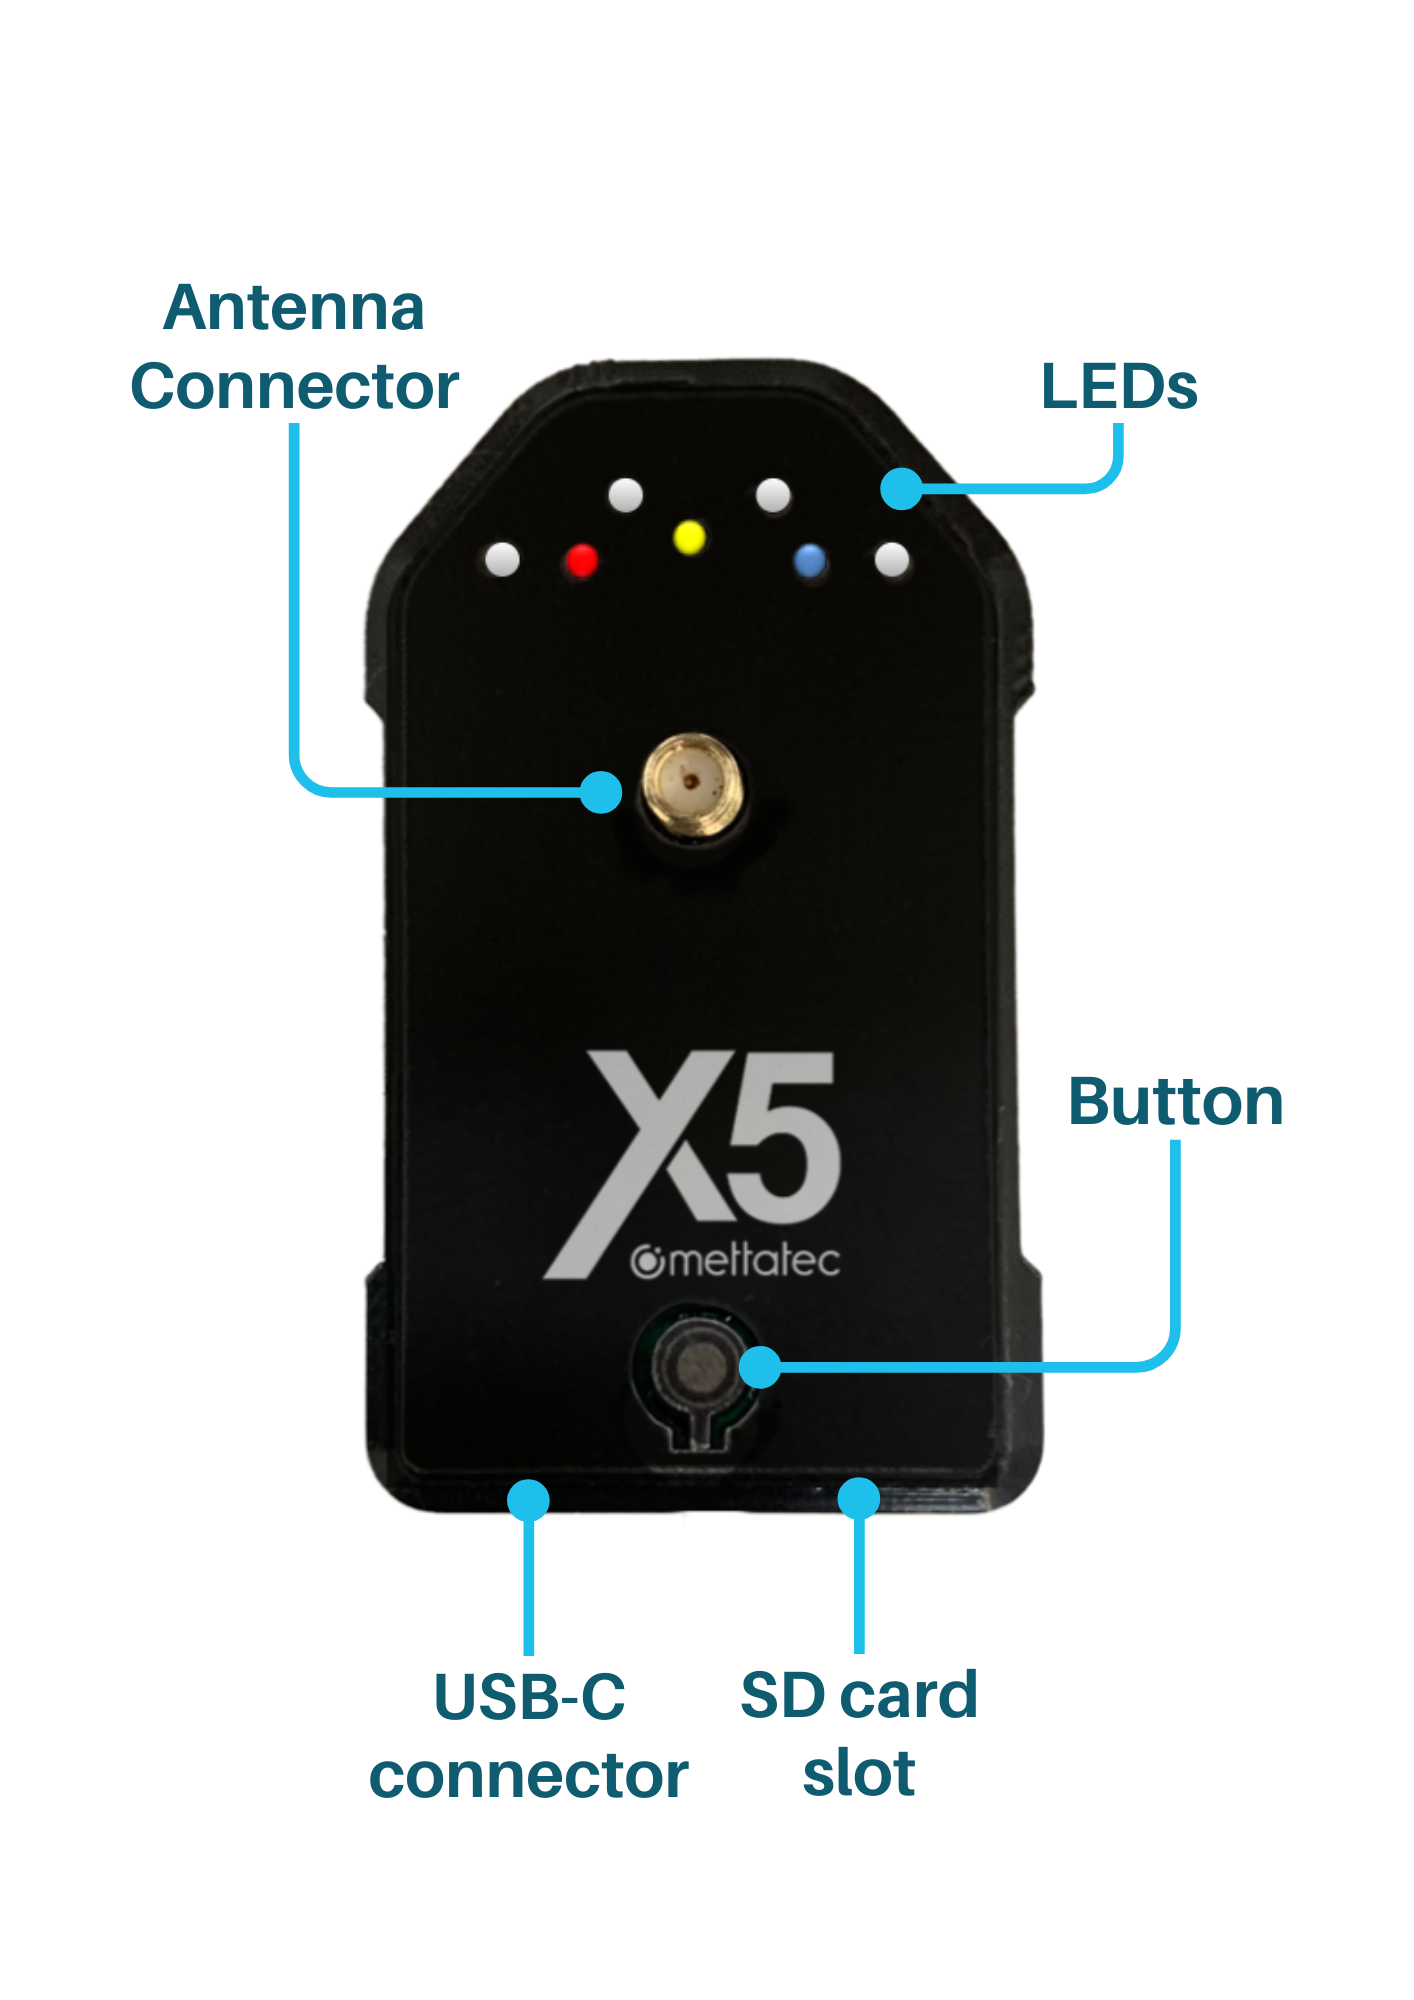
- MicroSD card slot
- Plug-in the SD card. Maximum capacity is 64 GB.
- LOG LED (RED) SD indicator:
- Blinking: Waiting for logging
- Solid: Recording in SD card
- WiFi LED (BLUE)
- Blinking: Server available to be connected
- Solid: Server connected
- PPS LED (YELLOW) PPS indicator:
- Blinking: Fix 3D GNSS position and time
- BAT LEDs (WHITE) Power indicator:
- 4 LEDs: Full battery 100%
- 3 LEDs: Between 75-99%
- 2 LEDs: Between 50-74%
- 1 LED: Between 25-49%
- No LEDs: Lower than 25%
- Antenna connector
- SMA female connector for external GNSS antenna
- USB-C type connector
- USB connection for battery charging and firmware updating.
Utilization
Operation modes
- Normal operation mode
- Turning On: Press the button until BLUE LED is blinking
- Turning Off: Press the button for 5 seconds. When releasing the button, all LEDs will be off
- Wi-Fi connection is available:
- SSID: X5 PPK XXXX, where XXXX is the MAC address
- Password is not required
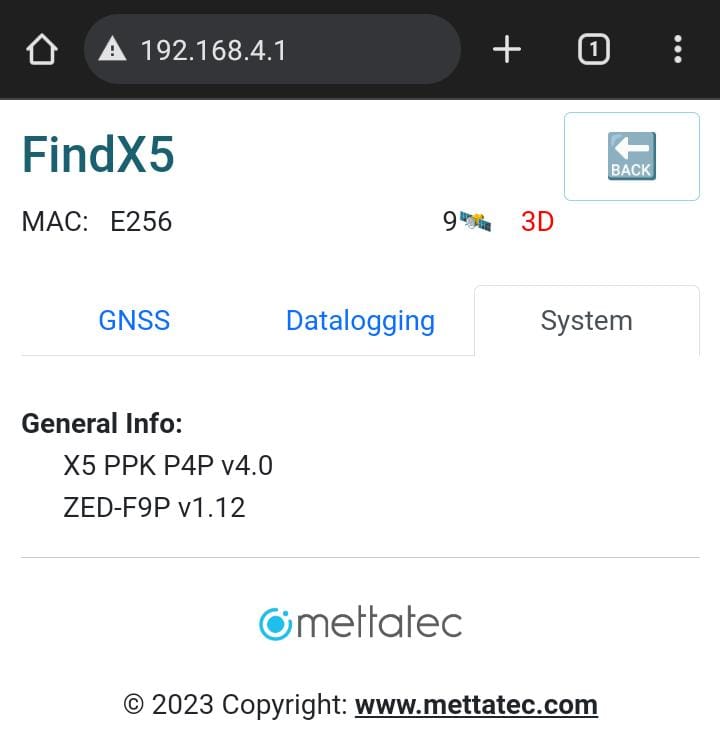
- Checking mode
- You can access to the checking mode by using the FindX5 App or using a web browser with the address http://192.168.4.1
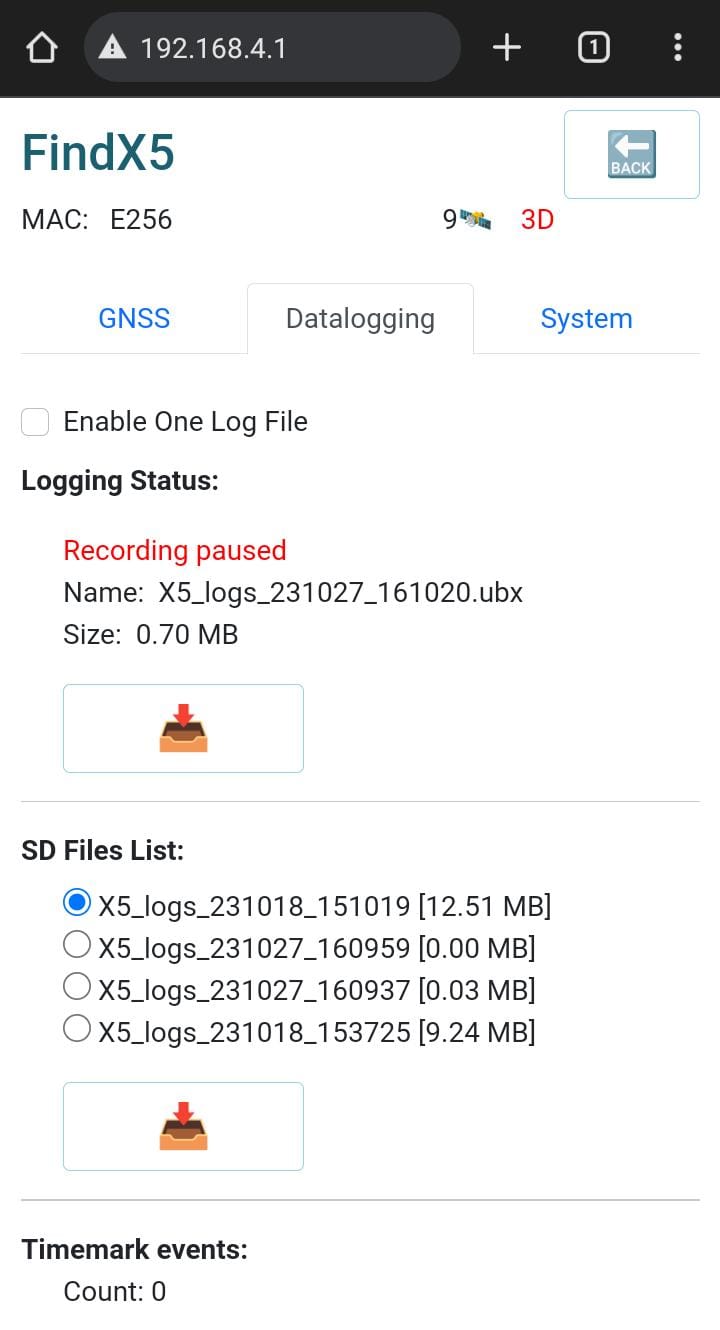
- You can download the data in this mode by clicking DOWNLOAD button choosing the corresponding file
- During this mode, the data logging to the SD card is paused (LOG LED is off). In order to resume data logging, click 'exit' button in Web UI
Use and configuration
PPK Flight Operation Requirements:
For integration is required:
- One GNSS X5 PPK Module for Mavic 2 Pro
- Multi-band GNSS UAV Antenna HeliX5
- One Drone: Mavic 2 Pro (Not included)
- One RINEX compatible GPS Base Receiver (Not included)
Installation on the Drone:
- Insert a MicroSD memory card into the X5 PPK Module
- Carefully insert the Trigger Sensor under the motor of the Drone's left front arm
- Install the GNSS Antenna HeliX5 on top of the X5 PPK Module by screwing it to the antenna connector
- Attach the X5 PPK Module into the drone's top side with the velcro included.
Drone Configuration:
Make sure that the front lights on the drone arms turn off when a camera shot is taken in photo mode. If this function is not activated, do the following:
- Turn on the Drone Mavic 2 Pro and its remote control.
- Enter the DJI GO 4 App and activate the front red lights of the Drone arms: Settings / MC Settings / Advanced Settings / Turn on Aircraft Arm LEDs.
Topographic Survey Flights
Before Flight:- Program your flight mission following the instructions of the flight control application you use: DJI GSP, Pix4D, DroneDeploy, MapsMadeEasy or others.
- The provided MicroSD memory card (Max. 64 GB capacity) MUST BE INSERTED in the GNSS X5 PPK Module.
- Turn ON the module by pressing the button until BLUE LED is blinking.
- Turn on your Mavic 2 Pro Drone.
- Wait for the RED LED of the GNSS X5 PPK Module light to be SOLID and not blinking. It takes around 30 seconds to automatically start recording the data log file.
- Once these verifications and recommendations have been made, you can now proceed to fly the Drone and capture the flight mission photos.
- By the end of each flight, the GNSS X5 PPK Module will already have recorded one UBX file, so it is ready to be powered OFF without the need of stopping the recording.
- All data logs (UBX files) are automatically saved in the MicroSD memory card.
- The data logs can be downloaded by extracting the MicroSD memory card or via Wi-Fi in the Checking mode.
- Photos captured by the Mavic 2 Pro Drone.
- RAW LOGS UBX of the X5 GNSS module of each flight performed
- RAW LOGS (UBX or RINEX) from a ground-based GNSS receiver
- List of Ground Control Point coordinates
- With this information, you will be ready to process the data through different photogrammetric software options.
Downloading data
The web configuration page allows you to see some information of the module like the satellites in view, position, and Firmware version.

On the other hand, in the “Datalogging” section, you can find the generated UBX files and download them if needed. To exit the configuration mode and resume data logging, press the “Exit” button at the top of the page.
Post-processing
The final PPK (Post Processing Kinematic) mapping workflow can be performed using the following software options. Each of them has its own steps to follow at the user choice. This is a list of post-processing programs according to their degree of difficulty and knowledge requirement in topography:- Toposetter 2.0 Pro (Trial Version / Paid Version)
- REDtoolbox (Trial Version / Paid Version)
- RTKLIB (Free Version)
- Emlid Studio (Free Version)
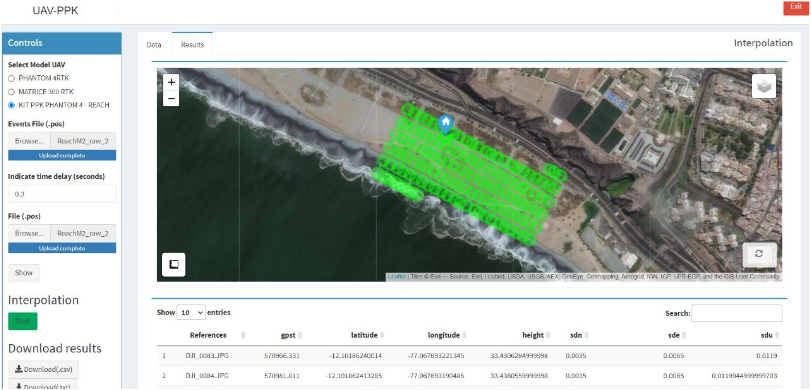
The UAV PPK App for event interpolation
The best online App for UAV PPK Event Interpolation. Corrects the millisecond difference between the DJI drone's camera trigger, the Drone's indicator LEDs and the event capture in the GNSS X5 PPK Module for maximum accuracy, so ground control points are no longer needed.Two post processed files need to be input to the App: the RINEX post-processing file (.POS) and the event file (.POS). And the precalculated delay time in seconds for DJI Drone LEDs: 0.3. The resulting geotagged file can be downloaded in CSV and TXT format, ready to input into any popular photogrammetry software:
- Exports a photo geotagging file
- Exports a file with the flight path of the drone
Being an online service, you can use the App anywhere without the need for software installations or licence activation. Developed by our technological partner SolucionesGeográficas (Geographic Solutions). Link: https://campussolucionesgeograficas.com/uav-ppk/
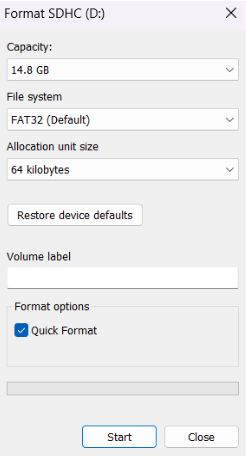
SD card formatting
This step is not strictly necessary, but this will permit avoiding future problems caused by the SD card. This process will erase all the content on your card, make sure you have safely saved all your important data on another device.
- Open "This PC"
- Select the drive of your SD card (right click)
- Select "Format"
- Select the following configuration for the File system and Allocation unit size:
- Select “Start”
Firmware update
Our devices are in continuous improvement and updates. Follow the next steps:
- Connect the X5 PPK to your computer.
- Open the “X5 Updater” application.
- Browse the firmware file (*.bin) provided by Mettatec.
- Select the COM Port where the X5 Module is connected (USB-SERIAL CH340).
- Press the “Upload Firmware” button.
- The X5 PPK will start the firmware updating process.
- When the updating is finished, the X5 PPK will restart.
Video tutorials
Downloads
Download the necessary firmware updates and executable applications for your device.